
In our further explorations of SciBorgs, we learned more about the various sensors available to us –– Encoders, Touch Switches, Light Sensors, and Ultrasonic Sensors. During our earlier explorations, we learned that using time to drive the SciBorg 10 feet wasn't very accurate, so this week, we looked at whether any of the sensors now available to us would be more helpful.
MotorEncoder
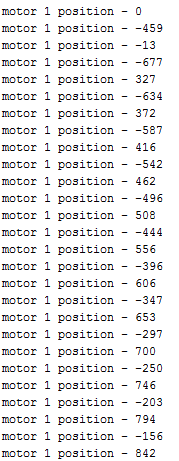
 We were initially given a code to look at, so that we could get an understanding of how encoders could be useful to us. Looking at the encoder values printed, we saw that if the SciBorg goes forward for 1 second and backwards for 1 second, the encoder value doesn't go to zero. This tells us that the distance traveled, going backwards vs. going forwards, was not the same. Instead, the numbers began to gradually increase (see the photo to the right).
We had a few ideas of what could the be the cause of this discrepancy. We thought that the delay may be caused by a non instantaneous switch from full speed forward to full speed in reverse. It could also be caused by a difference in the friction of the wheels or by the fact that one of the motors is slightly weaker than the other.
In order to get our SciBorg to travel a more accurate 10 feet before stopping, we used our encoder values and a bit of math. We initially created a while loop for as long as the encoder value was less than an arbitrary number, we said 3000. Then we had the SciBorg move along a straight line and measured the distance traveled, 27in. From there, we drew a proportion to calculate the necessary encoder value for the SciBorg to reach 120 inches. We found this to be 1333 1/3. We decided to use 13400 and found that with the encoders, we ended pretty much exactly on the 10 foot line! We found that using Encoders gave us a much more accurate result, as compared to using time.
The first code:


Our adapted 10 feet code:


The touch switch worked pretty well and was pretty straightforward. We used the first code to get an idea of how to use a touch switch and to make sure that it was working properly – print unpressed when unpressed, and printing pressed when pressed.
From there, we edited the original if statement so that it would drive forward if unpressed and stop when it was pressed by the delrin board at the end of the 10 foot path. We found that the touch switch worked pretty well – it stopped at the 10 foot mark because that's were we put the board.
The first code:

The updated 10 feet code:


The next sensor we looked at was the light sensor. Using the provided code, we found the the light sensor gave us scaled values between 0 and 100. The lower end of the spectrum was for darker surfaces and the higher end was for lighter surfaces. My partner and I found that the light sensor gave pretty accurate light readings of the surface it hovered over. This is true, unless the surface is reflective, in which case, it read the reflected light values. We also found that turning on the LED light negatively impacted the sensor value because it made everything appear bright. This was at least true for us because we needed to have the light sensor hovering above the ground. Speaking of such, we found that 1/4in or 7/10cm was a pretty good distance for the sensor to work properly. Taking that into consideration, we decided to attach a light sensor onto a conveniently placed axle.


Ultrasonic_sensor
The fourth sensor that we worked with was the ultrasonic sensor. The sensor works by shooting off sound waves and recording the time it takes for the sound to bounce back. When we used our first code to test values, we found the ultrasonic sensor gave us values of 11 when the delrin board was placed in front of the SciBorg.
Editing the code so that it would drive the SciBorg 10 feet and stop in front of the delrin board, we got a pretty decent reading. We found that the SciBorg stopped approximately 2in/5cm from the 10 feet mark. This is still significantly better than basing the distance off of time!
With some further experimenting, we found that the ultrasonic sensor works well against large flat surfaces, but not so well against table/chair/wheelchair legs. The object also has be in the sensor's direct line of sight sound. All in all, the sonar works decently well, but doesn't work for most circumstances.


StraightBangBang
For this assignment, we needed to fix a problem that has been plaguing us since our first day of using arduinos – serving SciBorgs. This code implements the usage of encoders in a bang bang format. If the left encoder value is larger than the right encoder value, the SciBorg will make a gentle right turn and vice versa for the opposite scenario.
In our experimentation, we found that the SciBorg did okay on the lab floor, but it still veered a bit. We didn't have a ton of time to calibrate the speed of the gentle turns, so maybe this is just because we didn't find the optimal motor turn speeds. The SciBorg did a little better on the carpet, so maybe the friction of the carpet helped to decrease discrepancy in the motor speeds. Surprisingly, our SciBorg did the best while going up a ramp and was the worse at going down the ramp. Our Sciborg made it all the way up the 10 feet ramp! Going down was a whole other story, it was unable to make it all the way down without falling off the side. Hmm..... maybe there's some sort of slippage occurring during the descent...


FollowLine
We had a lot of ideas when it came to the what to do with the path follower code – many of these implemented some sort of searching function in which the SciBorg would need to search for where the line turned. Some of these ideas were definitely more complicated than others and more clunky than others.
One idea I originally had was for the SciBorg to do a 90 degree pivot and than slowly sweep to the left in search of the curve. But, this would be extremely inelegant. Amy had an idea in which the SciBorg would make various turns in a search function. But this similarly did not end up working out.
At the end of the day, we found that we were overthinking the code. Returning to an earlier simpler version of an idea, with some tweaking, we were able to have the SciBorg successfully follow the path. We created another bang bang scenario in which the SciBorg would move forward if the light sensor read a value associated with a white line, the SciBorg would make a gentle right turn, if it read a value at the edge of the strip, and would make a gentle left turn if it read brown, the color of the board.


The first code:

The updated 10 feet code:


StraightBangBang
For this assignment, we needed to fix a problem that has been plaguing us since our first day of using arduinos – serving SciBorgs. This code implements the usage of encoders in a bang bang format. If the left encoder value is larger than the right encoder value, the SciBorg will make a gentle right turn and vice versa for the opposite scenario.
In our experimentation, we found that the SciBorg did okay on the lab floor, but it still veered a bit. We didn't have a ton of time to calibrate the speed of the gentle turns, so maybe this is just because we didn't find the optimal motor turn speeds. The SciBorg did a little better on the carpet, so maybe the friction of the carpet helped to decrease discrepancy in the motor speeds. Surprisingly, our SciBorg did the best while going up a ramp and was the worse at going down the ramp. Our Sciborg made it all the way up the 10 feet ramp! Going down was a whole other story, it was unable to make it all the way down without falling off the side. Hmm..... maybe there's some sort of slippage occurring during the descent...


FollowLine
We had a lot of ideas when it came to the what to do with the path follower code – many of these implemented some sort of searching function in which the SciBorg would need to search for where the line turned. Some of these ideas were definitely more complicated than others and more clunky than others.
One idea I originally had was for the SciBorg to do a 90 degree pivot and than slowly sweep to the left in search of the curve. But, this would be extremely inelegant. Amy had an idea in which the SciBorg would make various turns in a search function. But this similarly did not end up working out.
At the end of the day, we found that we were overthinking the code. Returning to an earlier simpler version of an idea, with some tweaking, we were able to have the SciBorg successfully follow the path. We created another bang bang scenario in which the SciBorg would move forward if the light sensor read a value associated with a white line, the SciBorg would make a gentle right turn, if it read a value at the edge of the strip, and would make a gentle left turn if it read brown, the color of the board.


Here's a video of our SciBorg following along a white path.
It's a little slow, but as we all know pretty well, slow and steady wins the race! (Although, we had a little more time to work on this, we would just increase the motor speed and that should make the SciBorg go faster) Also, we found that the SciBorg sometime struggled with making turns on the tape – increasing the speed should also help with this.
 |
| http://www.mcs.uvawise.edu/rjh7g/rh/farks/farks_fall_2010/Slow_and_Steady_Wins_the_Race.jpg |
I love that you added the "slow and steady wins the race" photo at the end, it's so funny!
ReplyDelete